
Browse help topics
Getting Started
Need help choosing?
Need help after purchase?
Download & Import
Using your notebook/planner
- How to change or reuse template pages on planner landing pages
- Why stickers look blurry when enlarged
- What to check if a product does not work on your device
- How to use NozomuNoto index pages
- How to use NozomuNoto template pages
- How to change a digital planner cover
- How to install and use digital stickers
Product Tutorials
- How to use Yume Techo Landscape tutorial pages
- How to use Yume Techo Portrait tutorial pages
- How to use Shibui Techo Weeks tutorial pages
- How to use Shibui Techo Months tutorial pages
- How to use Yume Noto V1 Landscape tutorial pages
- How to use Yume Noto V1 Portrait tutorial pages
- How to use Yume Noto V2 Landscape tutorial pages
- How to use Yume Noto V2 Portrait tutorial pages
- How to use Yume Noto V3 Portrait tutorial pages
- How to use NozomuNoto Ultimate Digital Stickers
- How to use NozomuNoto Digital Covers
- Which NozomuNoto instruction or tutorial file should I open first?
Device & App
iOS / iPadOS
GoodNotes
Notability
Noteshelf
Noteful
StarNote
Flexcil
Kilonotes
Android
StarNote
Samsung Notes
Penly
Flexcil
Noteshelf
Xodo
E-reader Devices
Boox devices
reMarkable
Bigme
Supernote
Kindle Scribe
Other e-reader devices
How to use Yume Techo Portrait tutorial pages
Learn how to use Yume Techo Portrait tutorial pages, including navigation, table of contents, calendar, templates, monthly, weekly, daily, yearly, goals, and notes.
On this page
- Start here
- Built-in tutorial pages and visual guide
- Tutorial Page 1/10 - Basic Navigation
- Tutorial Page 2/10 - Table of Contents
- Tutorial Page 3/10 - Calendar Page
- Tutorial Page 4/10 - Template Pages
- Tutorial Page 5/10 - Monthly Page
- Tutorial Page 6/10 - Weekly Page
- Tutorial Page 7/10 - Daily Page
- Tutorial Page 8/10 - Yearly Page
- Tutorial Page 9/10 - Goals Page, Life Planner
- Tutorial Page 9/10 - Goals Page, Goal Index
- Tutorial Page 9/10 - Goal Planner Page
- Tutorial Page 10/10 - Notes Index
- What is different about Yume Techo Portrait
- How to use this planner first
- What each main area is for
- What to start with first
- A simple first-week setup
- Read deeper page ideas
- When the Yume Techo Portrait setup gets tricky
- 1. The page feels long
- 2. Monthly boxes feel small
- 3. Life Planner pages become too much
- 4. A copied template page disappears into the planner
- Where to go next
Use this guide if you use Yume Techo Portrait and want to know what to do with each planner area. The screenshots below use NozomuNoto Yume Techo 2026 Portrait Monday Garden as the light example.
Start here
- Start with Index, Monthly, Weekly, and one Notes or Template page.
- Use Table of Contents to choose the section you need instead of scrolling through the whole planner.
- Use Life Planner pages only when you want a bigger-picture reset, not as daily homework.
- Use Tips & Ideas when you want more examples for Monthly, Weekly, Daily, Life Planner, Goal Planner, and Template Pages.
Built-in tutorial pages and visual guide
Use the images below as visual checkpoints. The extra notes explain what to do with the page after you understand what it shows.
Tutorial Page 1/10 - Basic Navigation
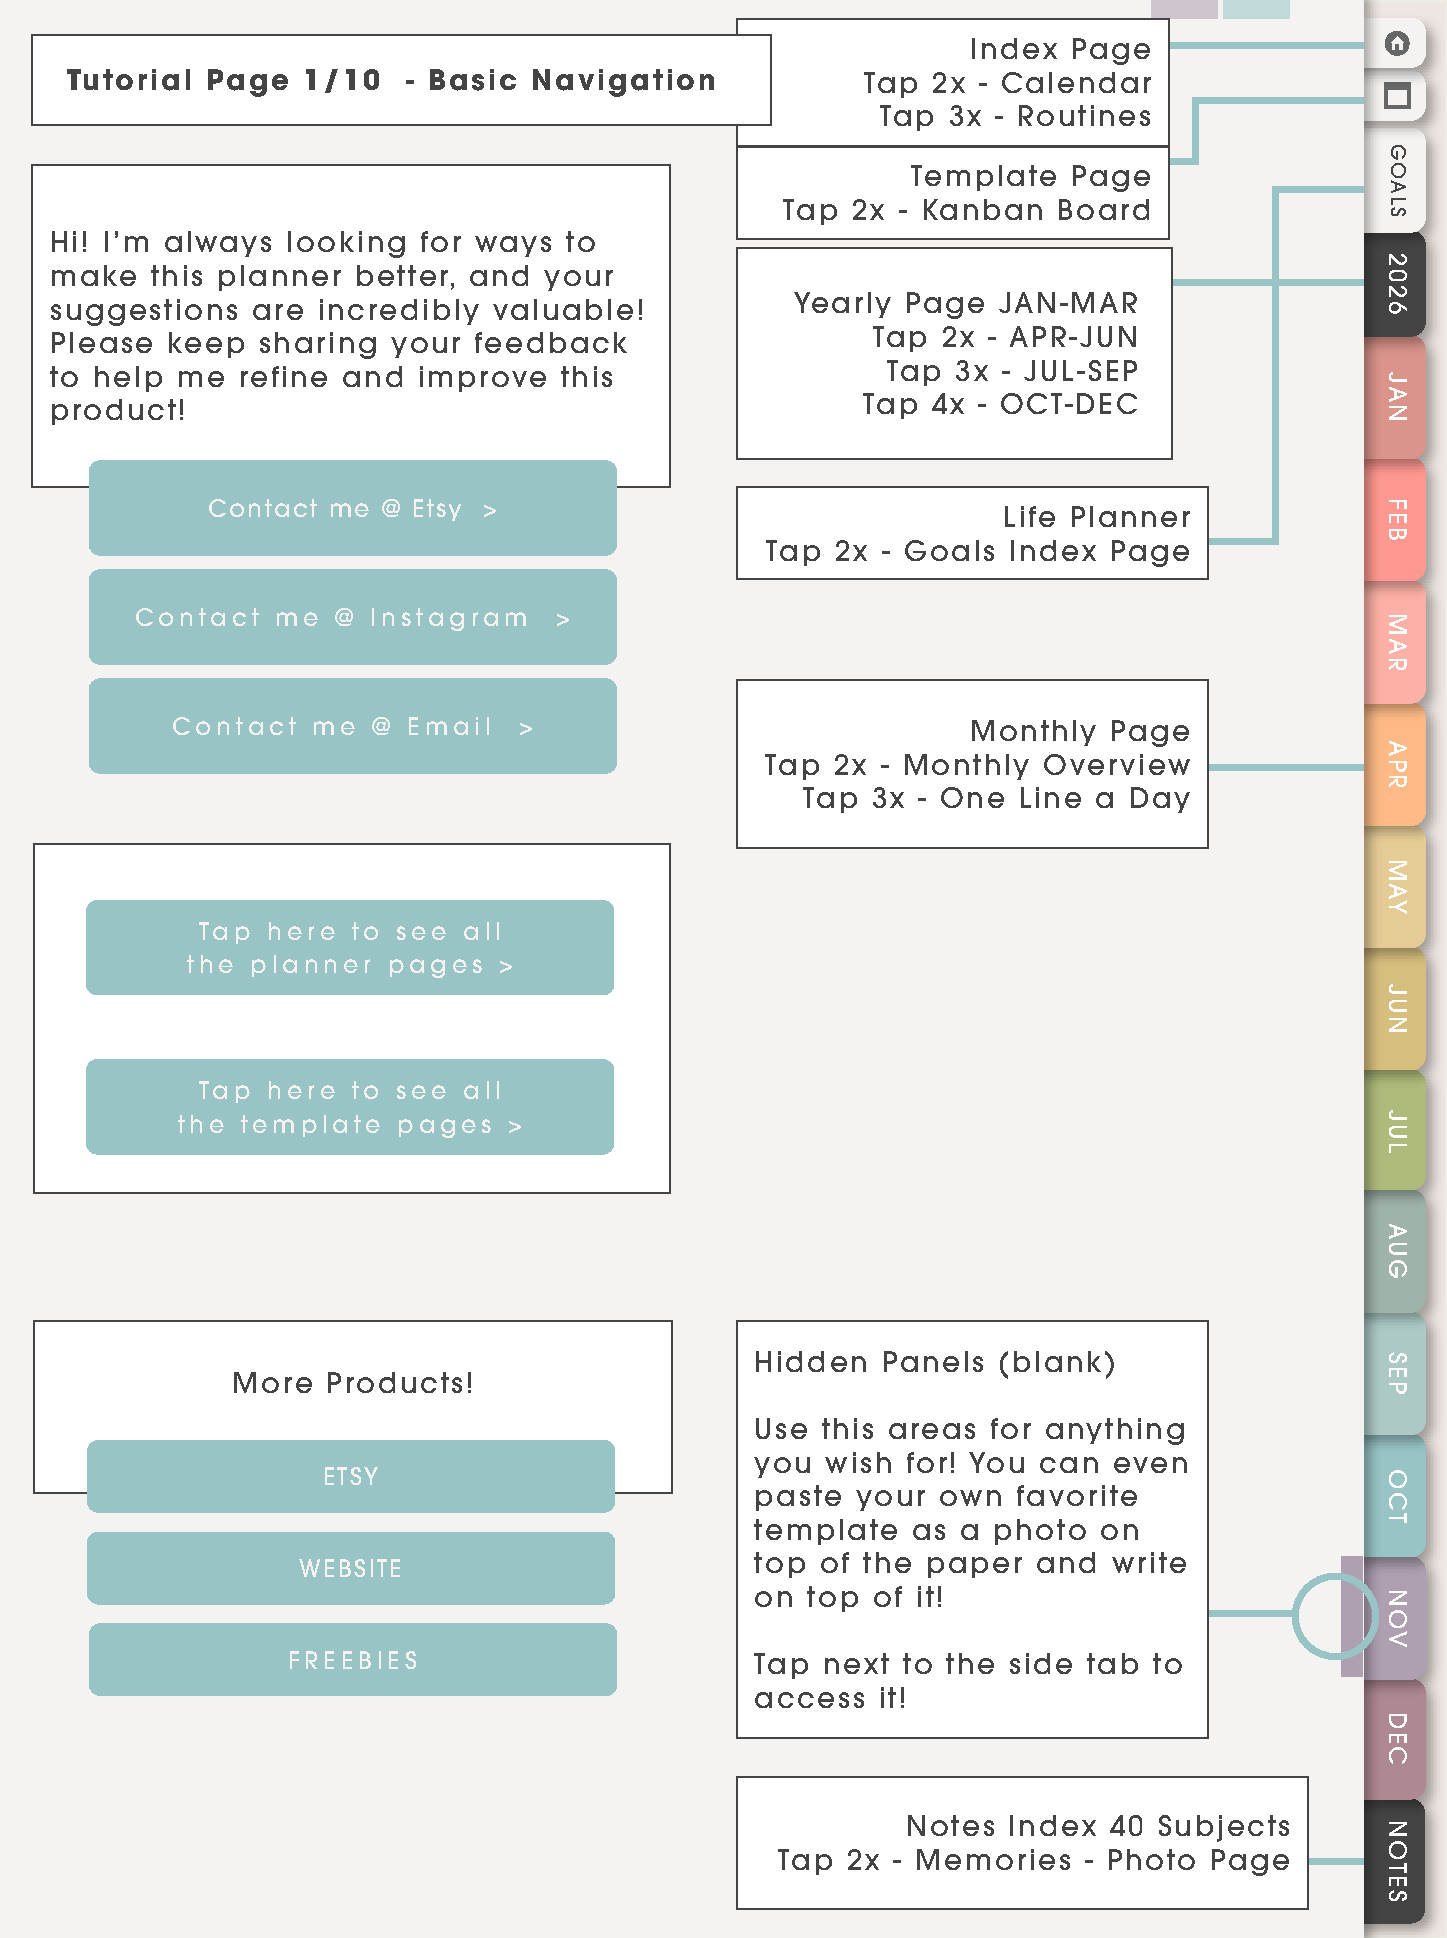
This page is the planner map. Use it to understand where the main areas live before you start filling pages: calendar pages, life planner pages, templates, notes, and support links.
For everyday use, you do not need every button. Start with Index, current Monthly, current Weekly, and one Notes or Template page.
Tutorial Page 2/10 - Table of Contents
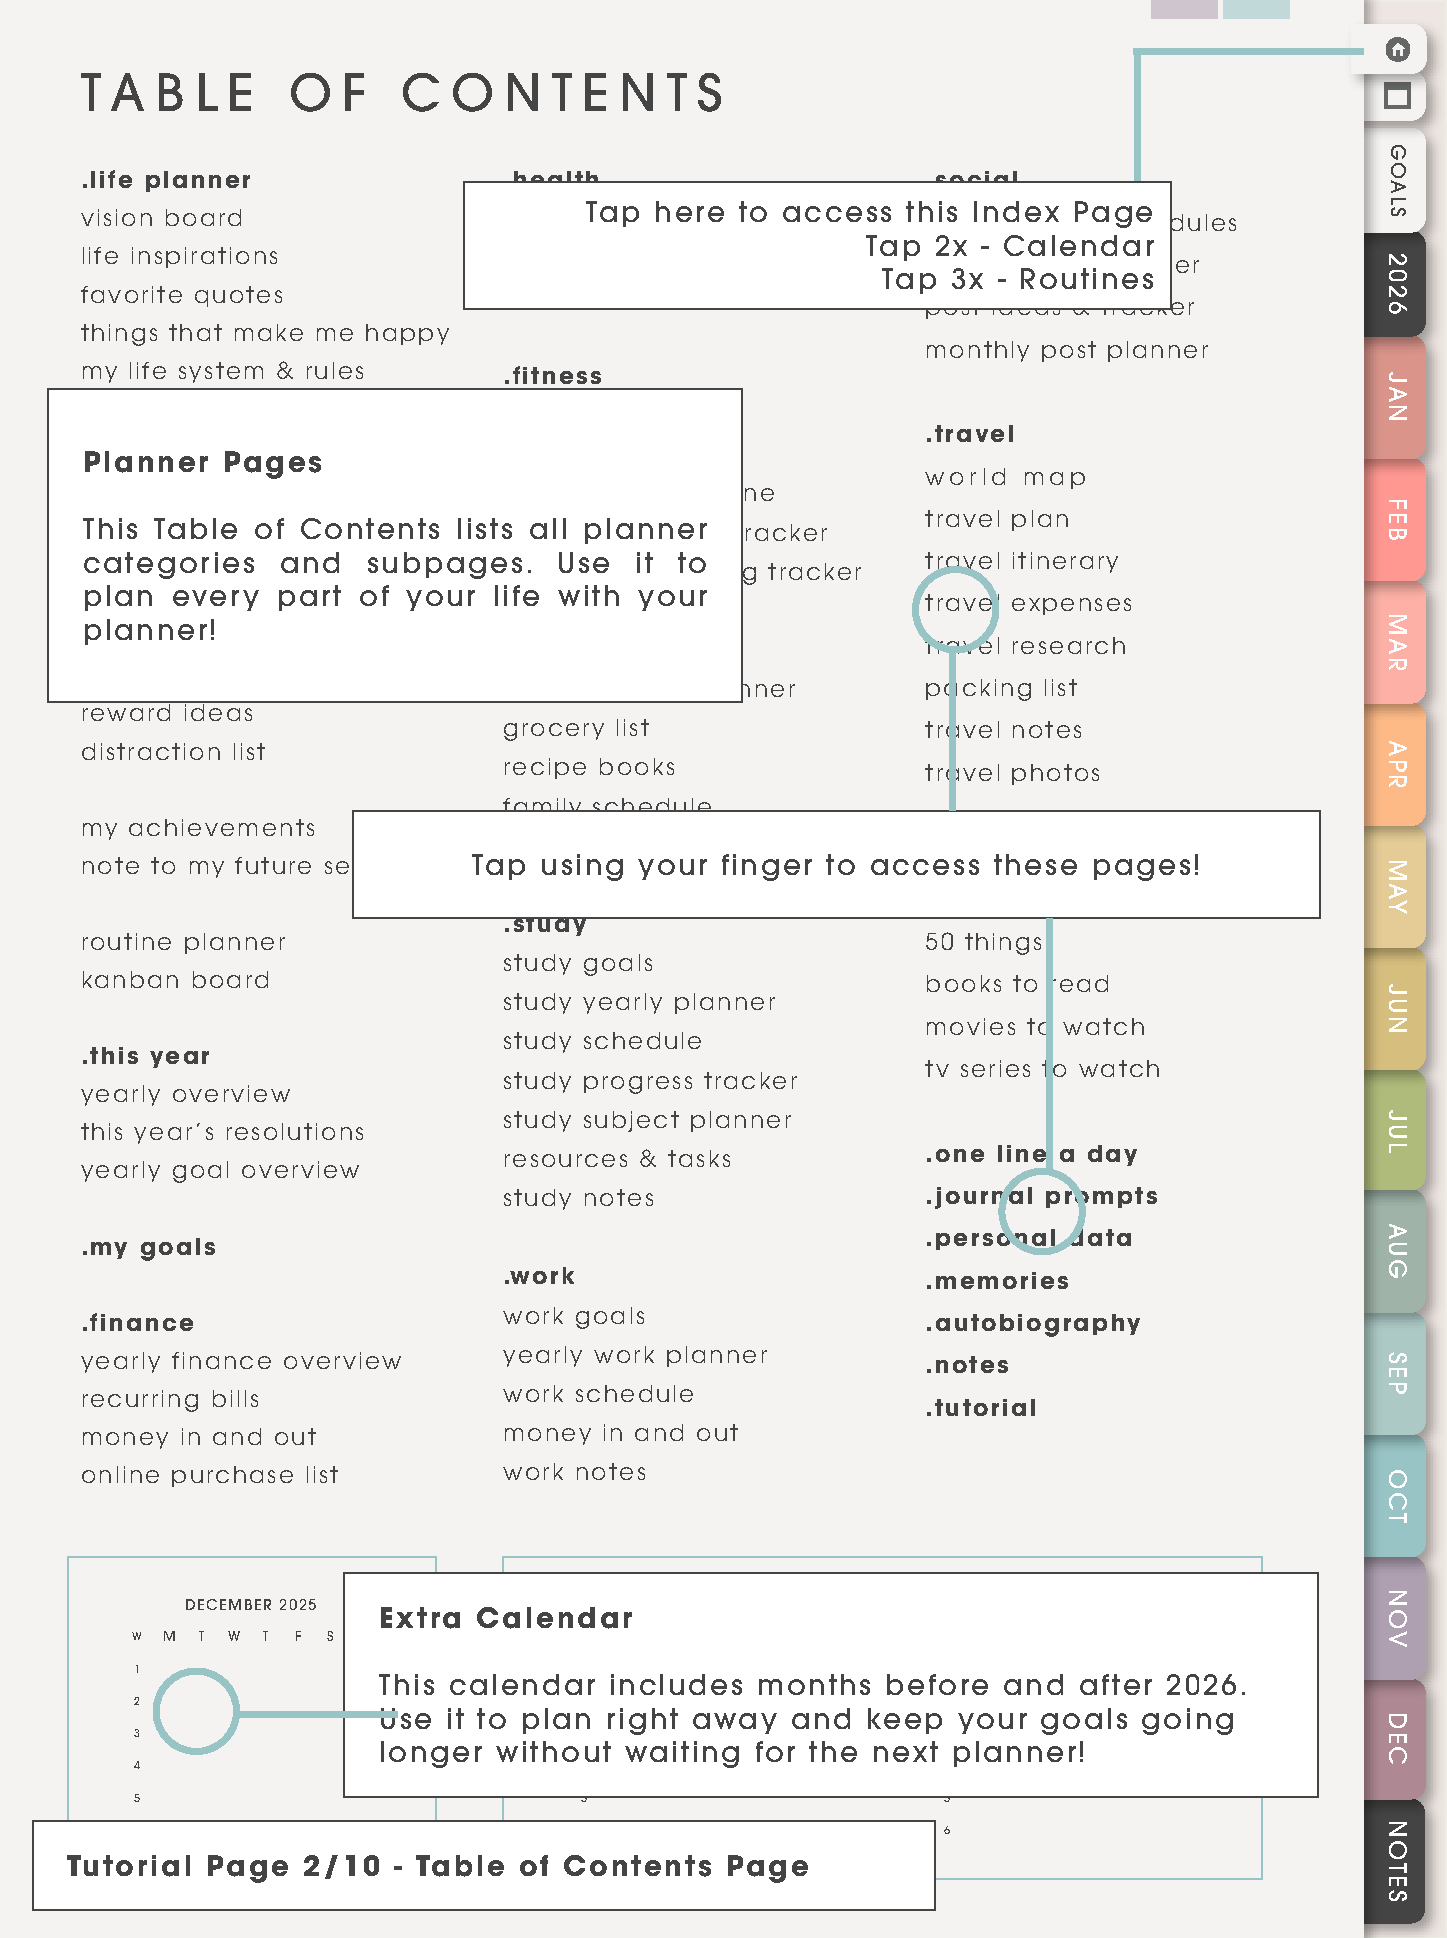
Use Table of Contents when the planner feels big. It helps you choose the right section before scrolling: Life Planner for bigger-picture planning, Planner Pages for repeated systems, Notes for saved information, and My Pages for custom or copied pages.
Tutorial Page 3/10 - Calendar Page
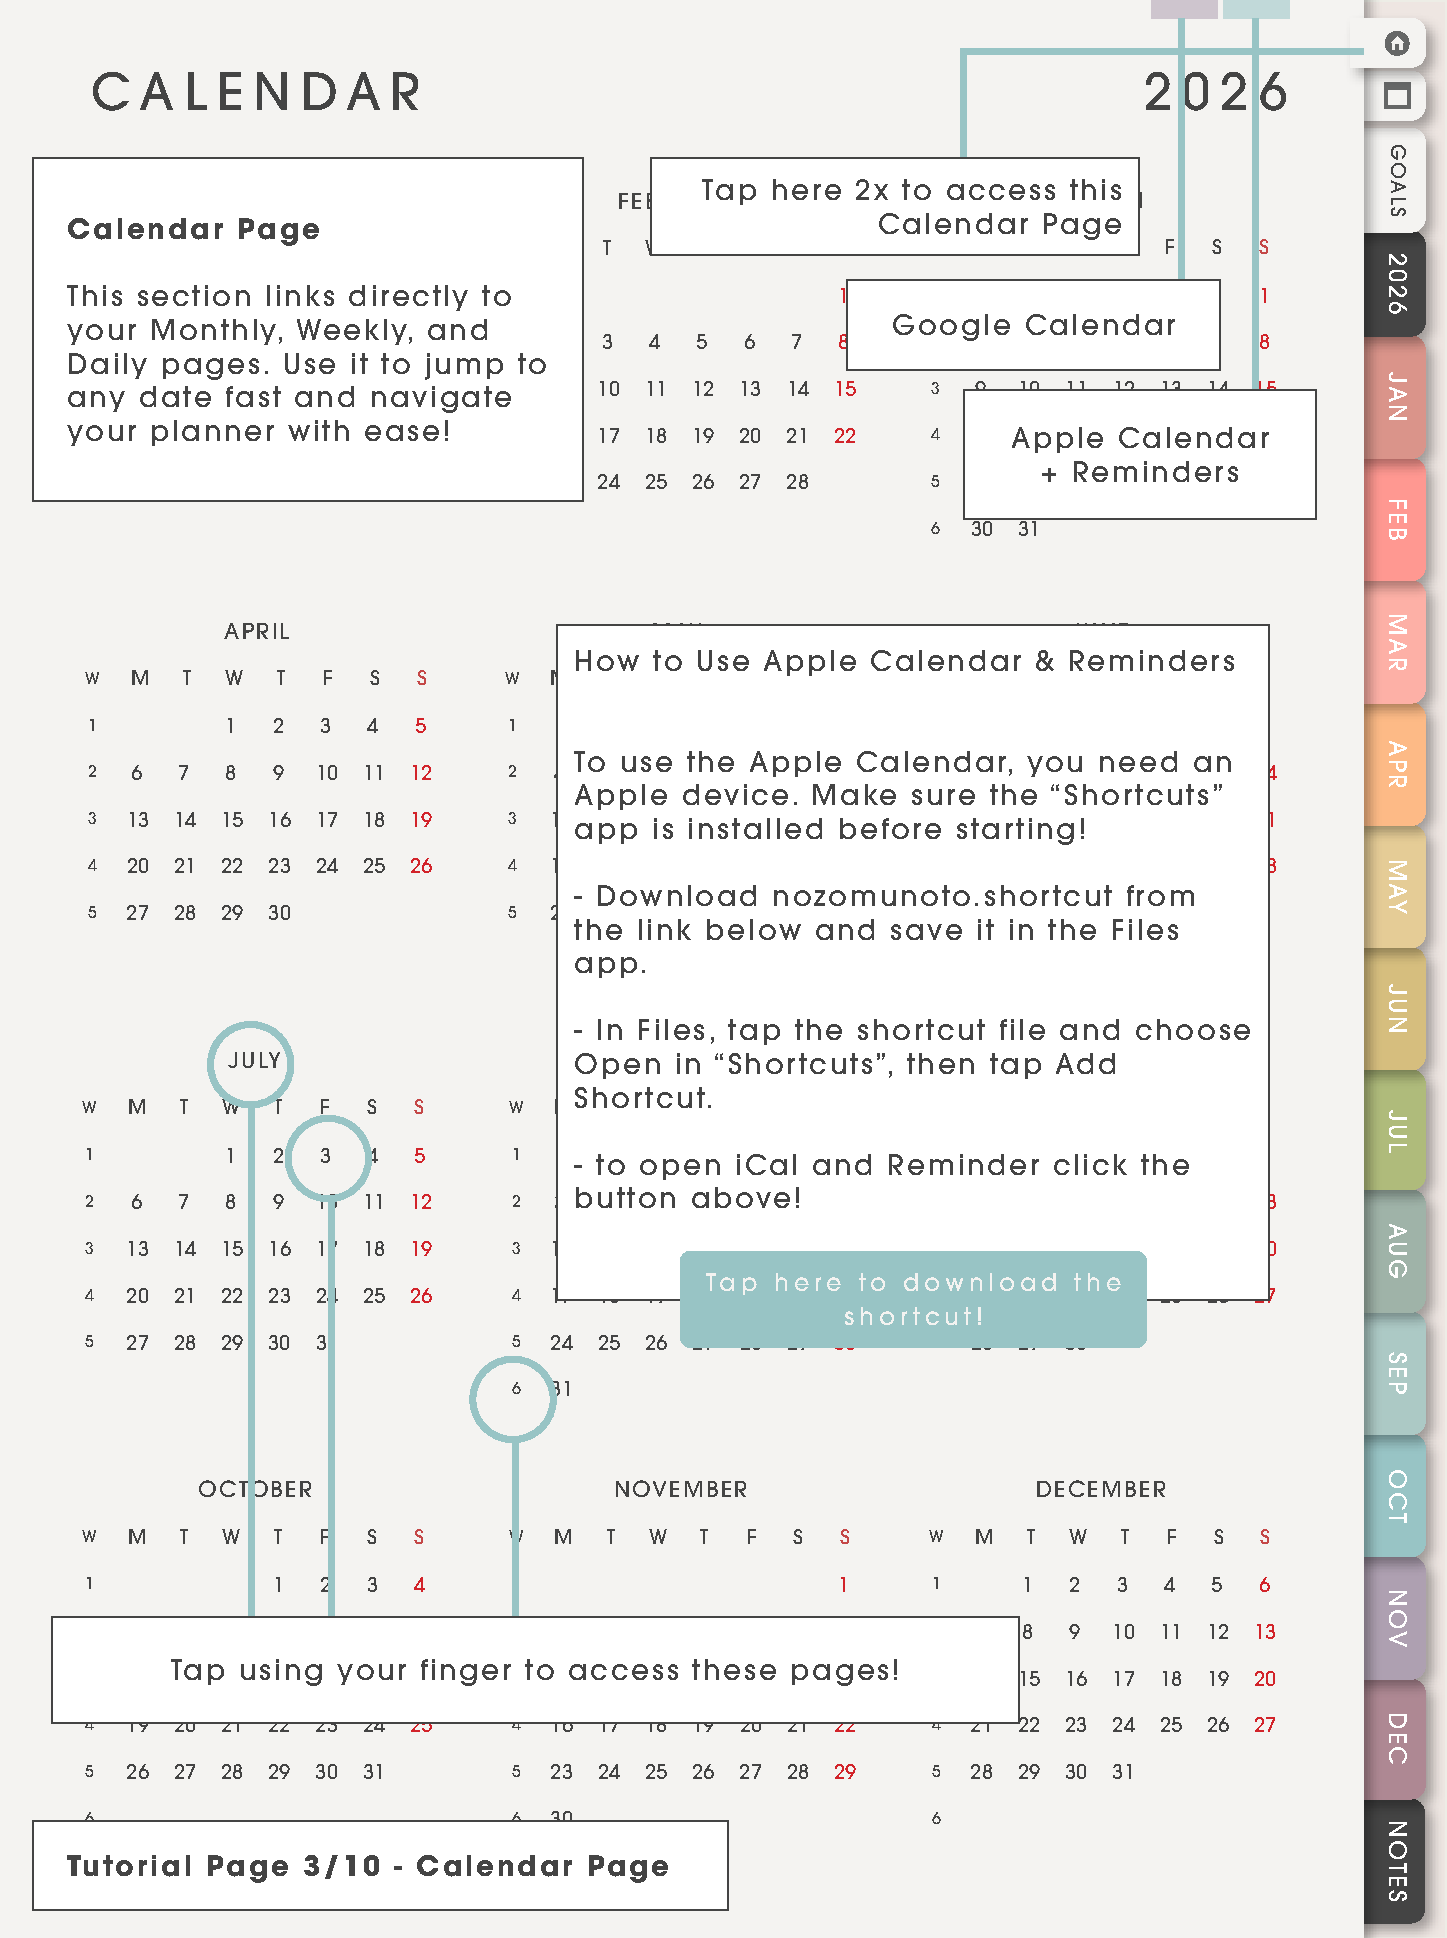
Use Calendar Page as the yearly calendar doorway. It is helpful when you want to jump into a month, check the shape of the year, or connect planning with reminders outside the PDF.
Put real dates on Monthly pages, then return to this calendar when you need the broad view again.
Tutorial Page 4/10 - Template Pages
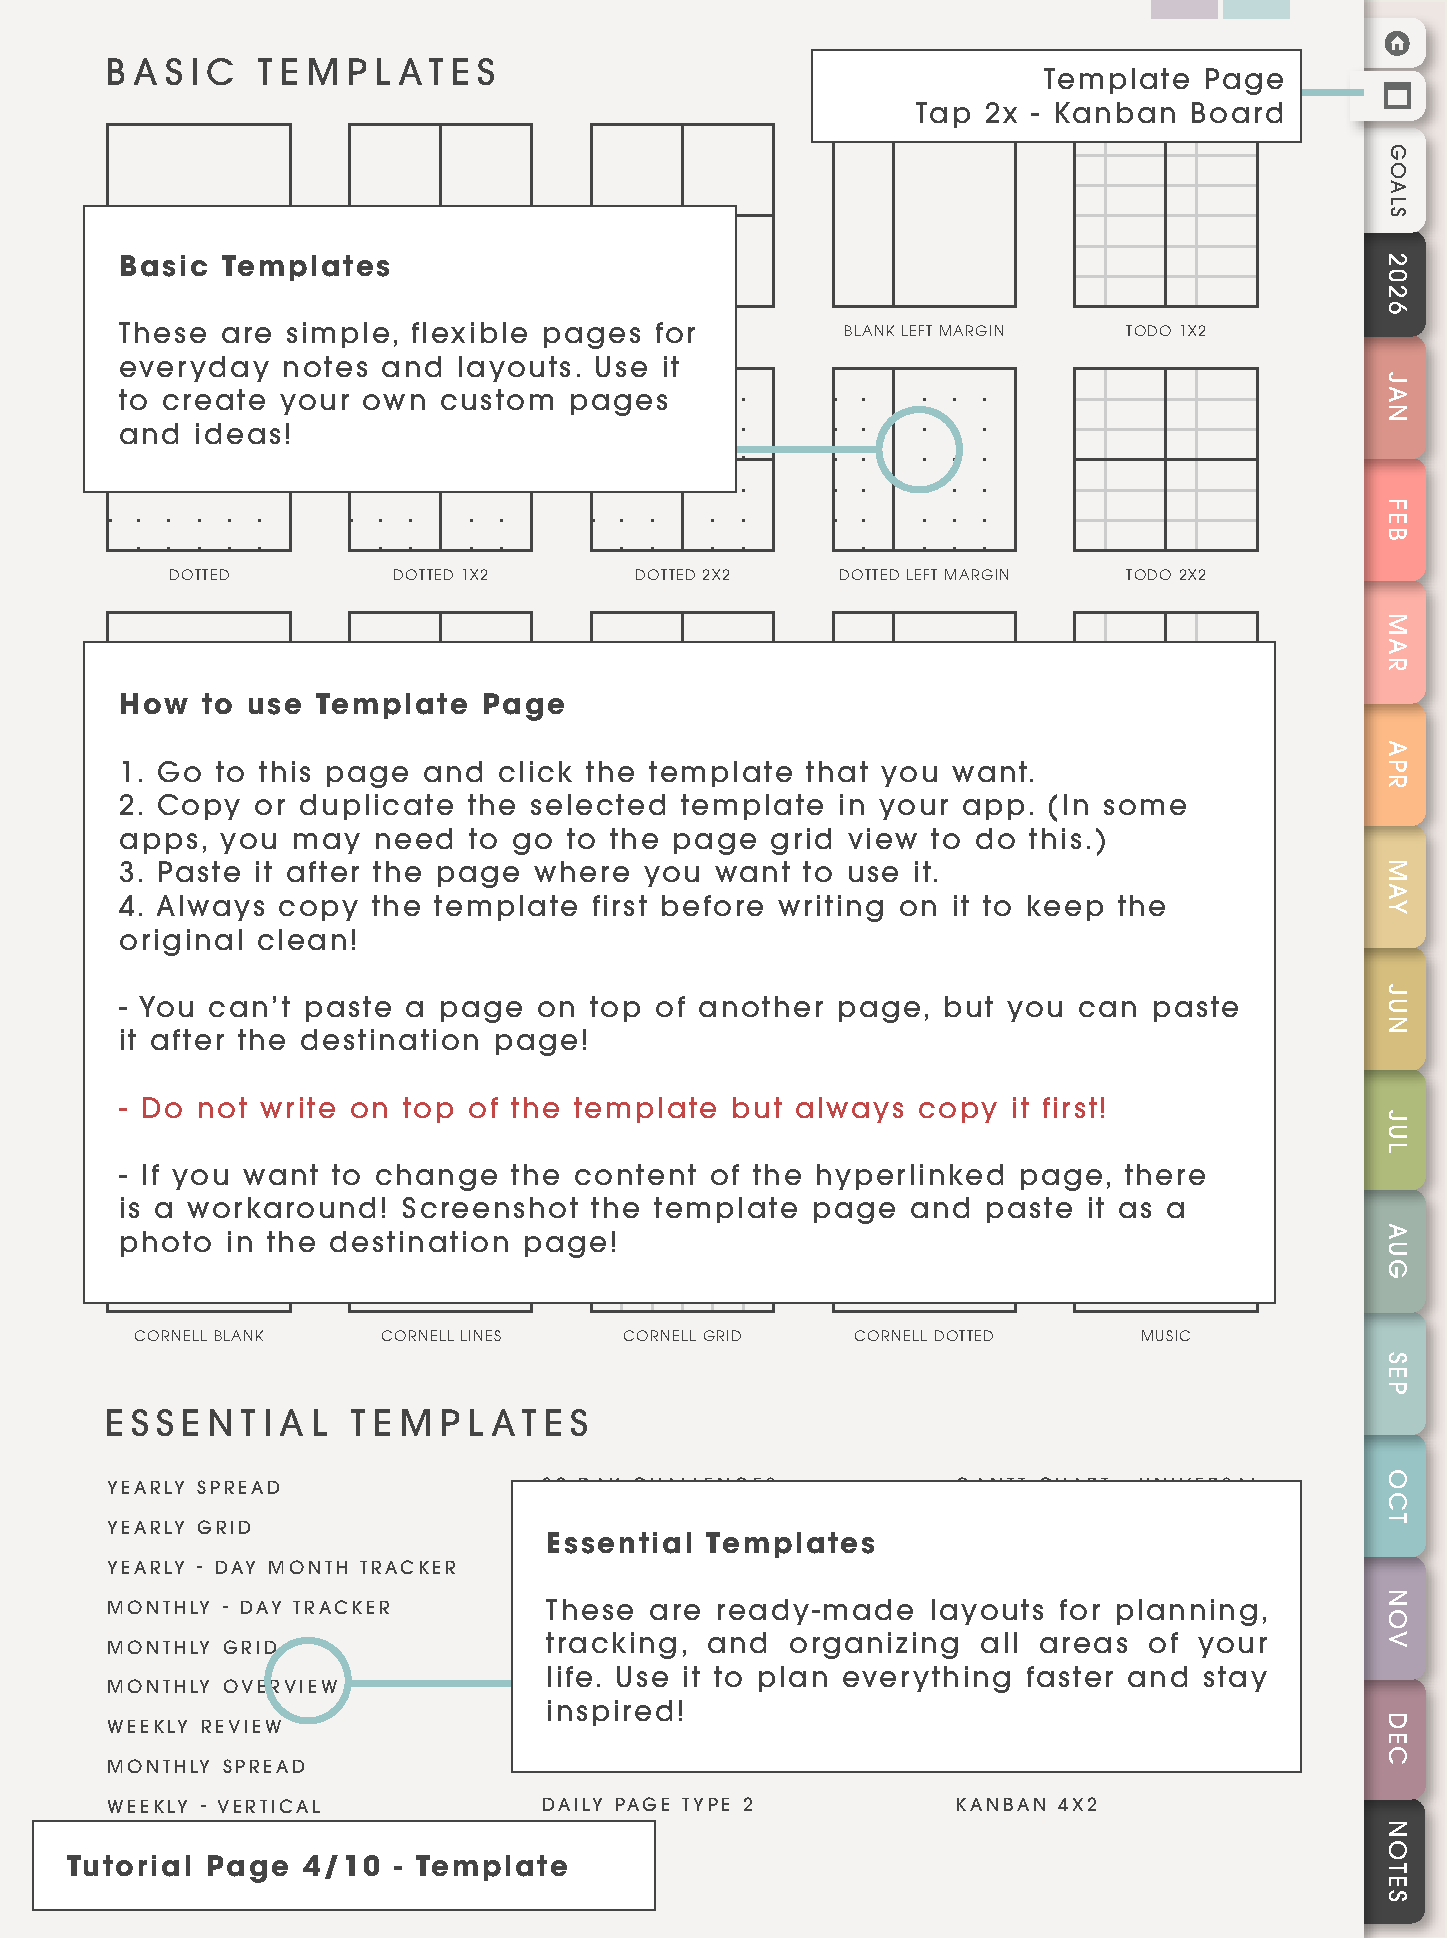
Template Pages are clean reusable masters. Copy a template first, then write on the copy. Use basic templates for flexible notes and essential templates for structured pages such as routines, kanban, challenges, photo pages, trackers, or planning lists.
Tutorial Page 5/10 - Monthly Page
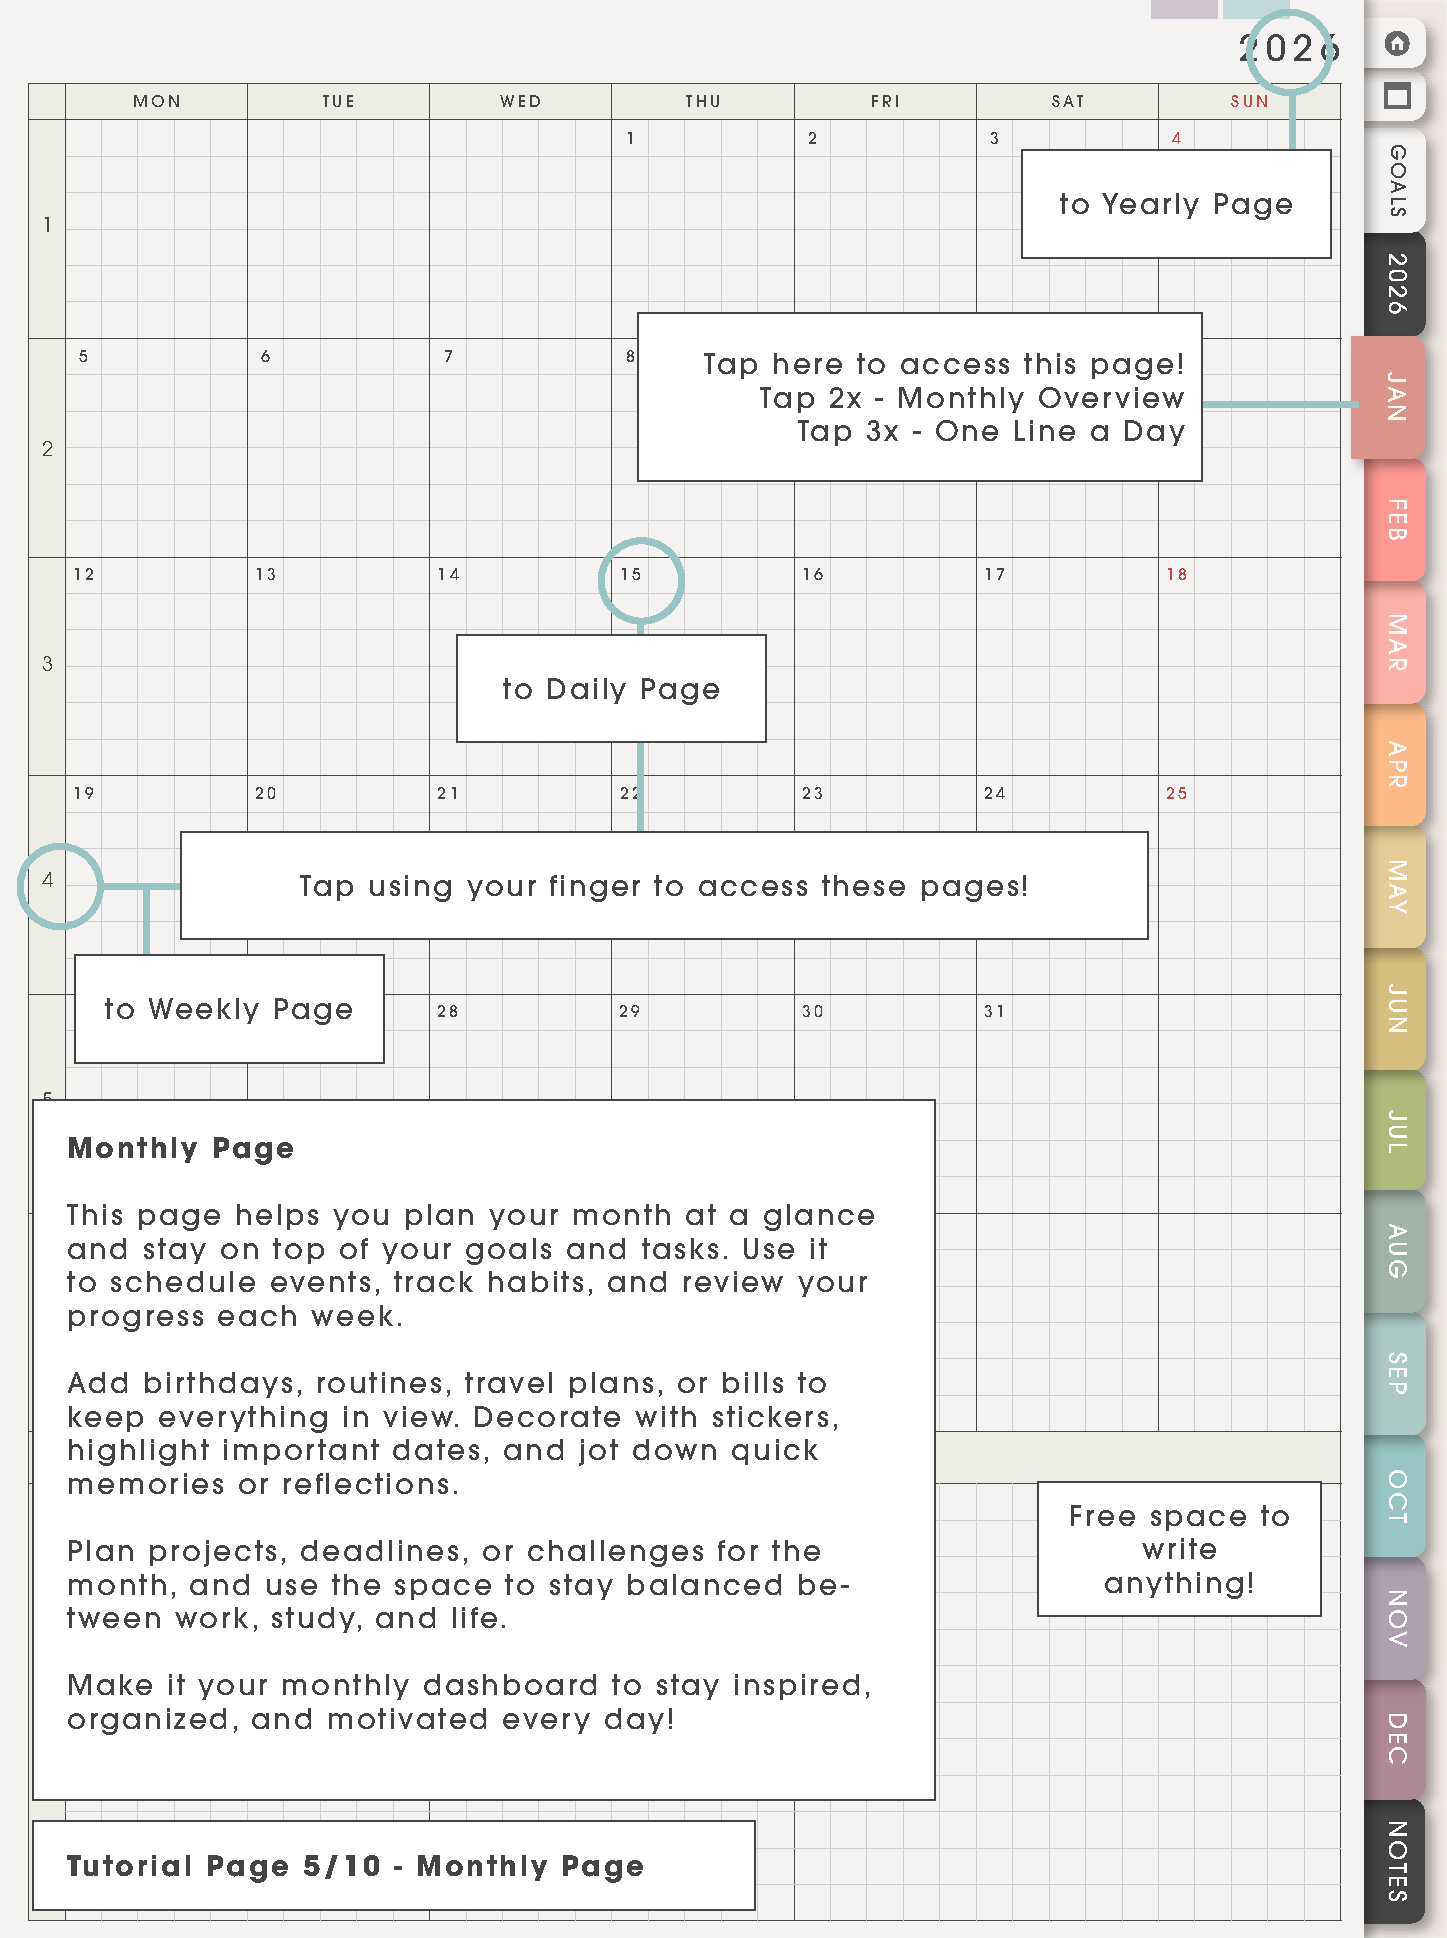
Use Monthly for dates that already exist: birthdays, bills, appointments, deadlines, school dates, trips, launches, renewals, and reset days. Keep the boxes short and readable.
If one date needs more detail, continue it on the matching Weekly, Daily, Notes, or Template page instead of filling the whole month with tiny writing.
Tutorial Page 6/10 - Weekly Page
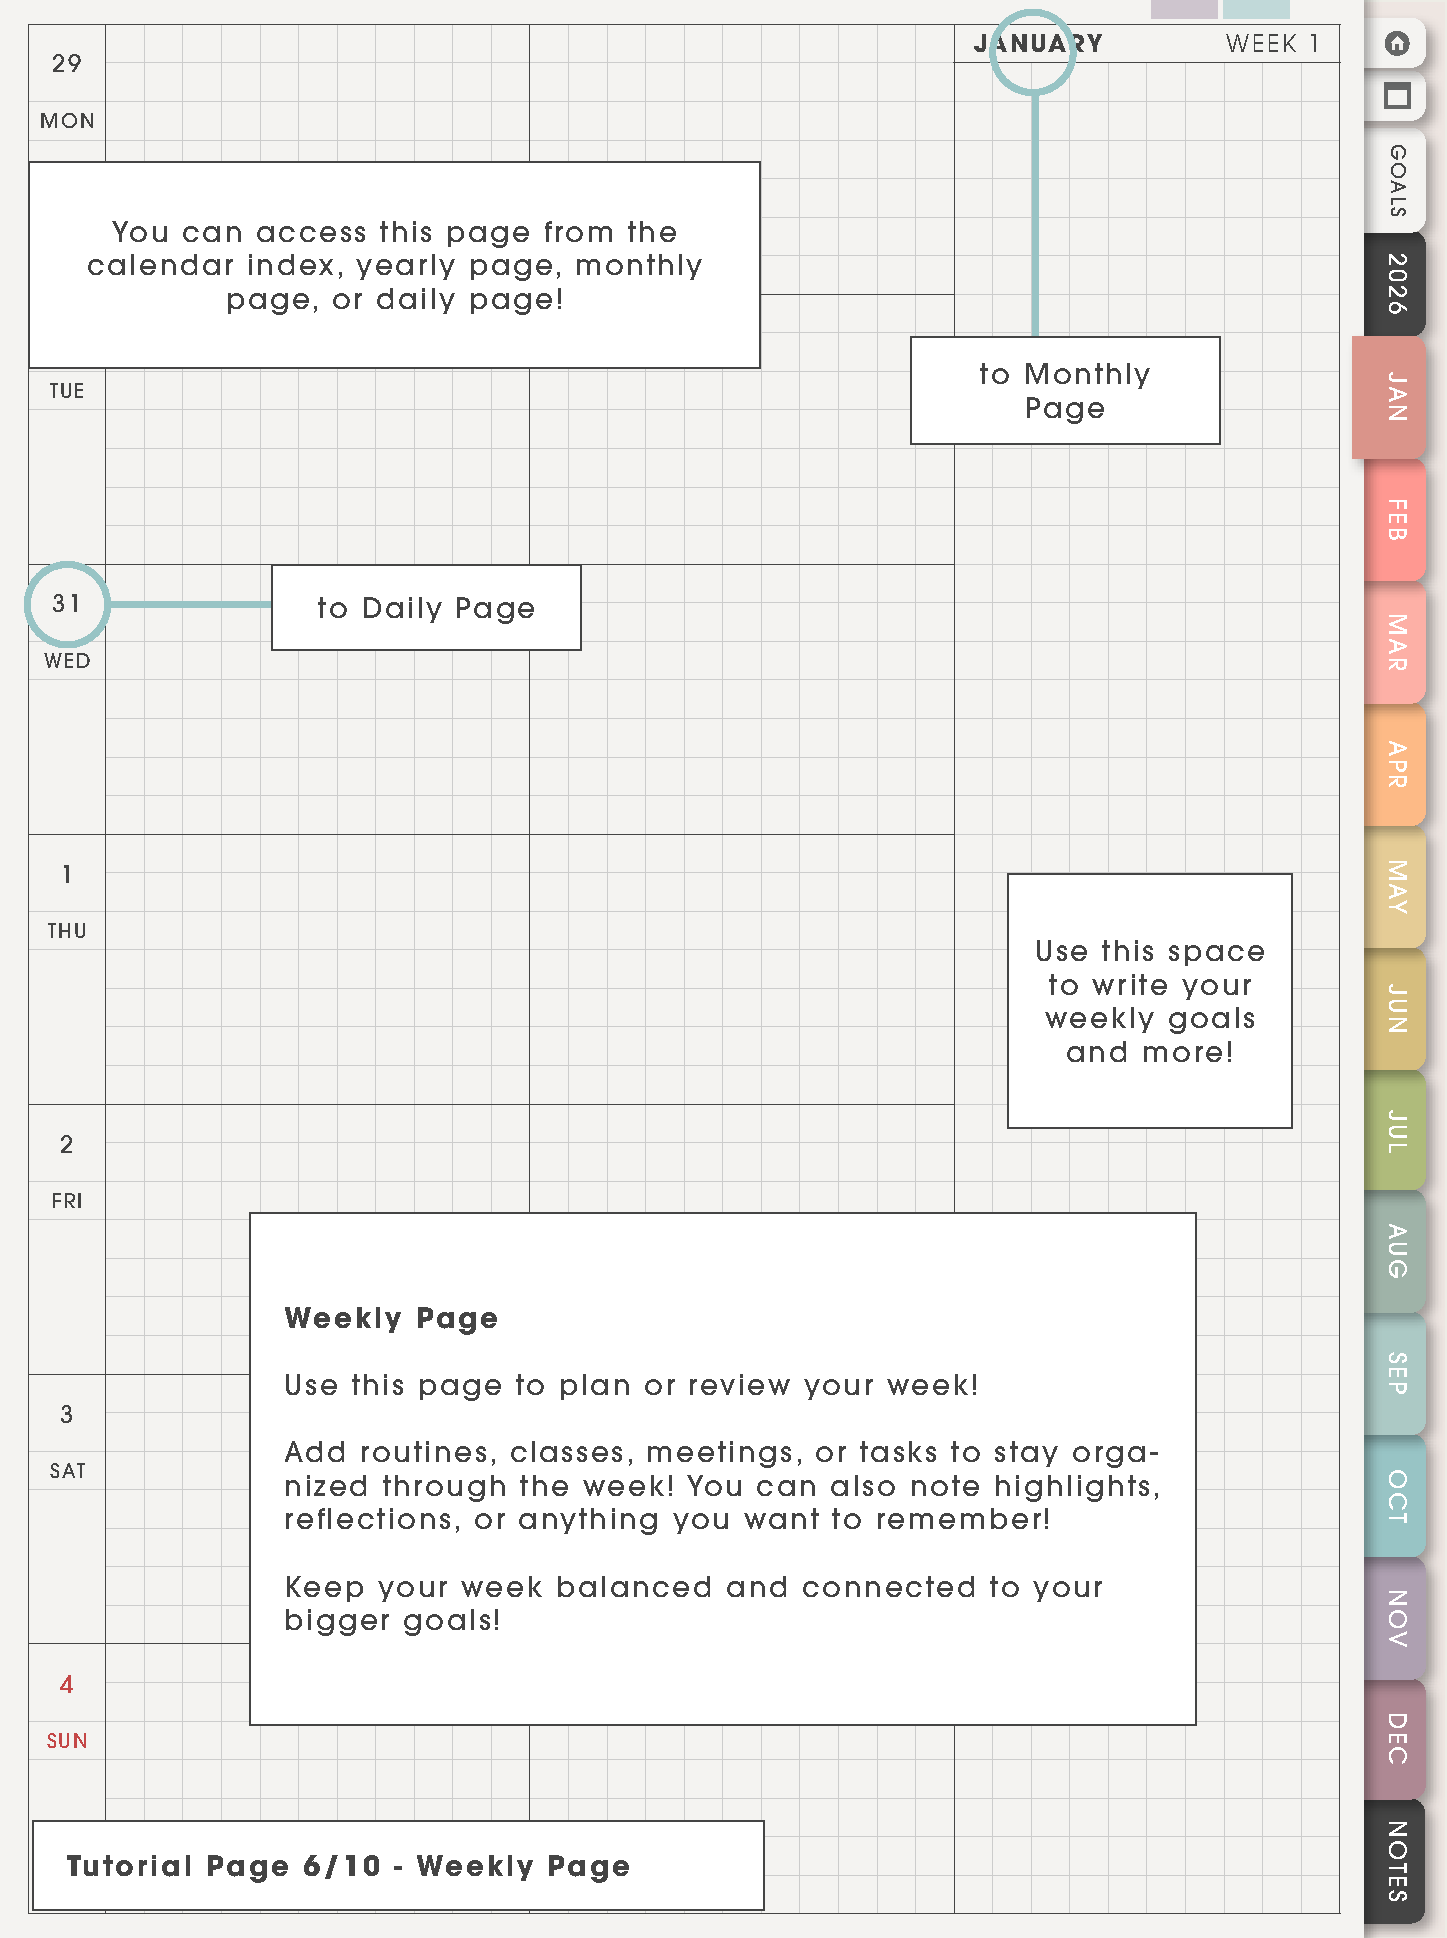
Weekly is the working plan. Use it for classes, work shifts, appointments, routines, errands, meals, study blocks, follow-ups, and the few next actions that matter this week.
Keep long project notes, class details, trackers, and messy ideas on Notes or copied Template Pages so the weekly page can stay easy to read.
Tutorial Page 7/10 - Daily Page
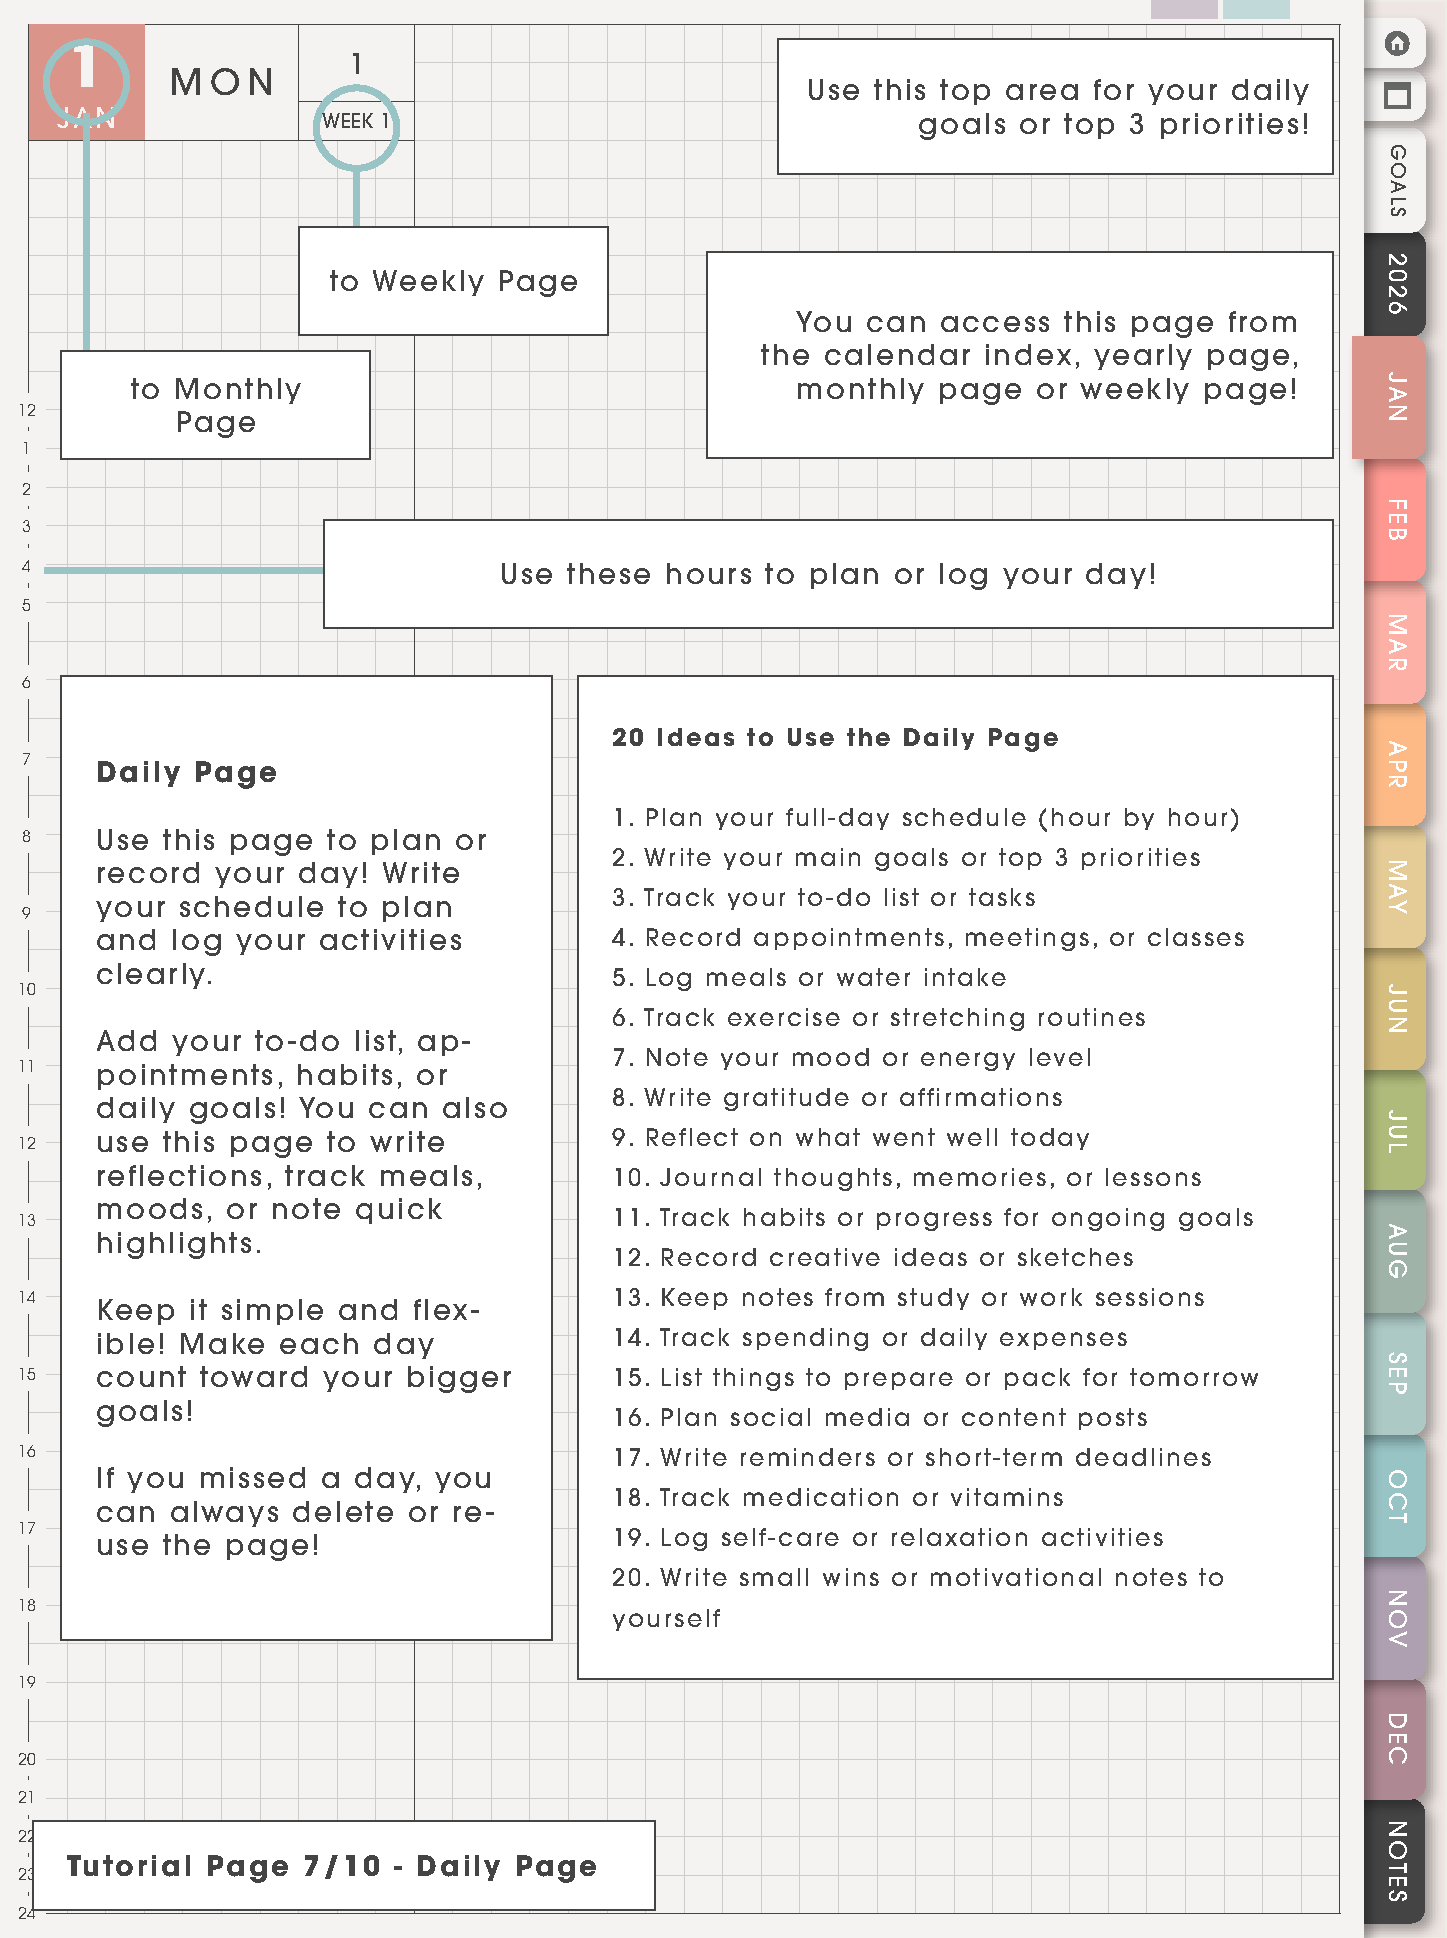
Use Daily when today needs more room than the weekly page. It works well for a packed schedule, study day, messy day, appointment day, reset day, or a day with many thoughts.
You do not have to use a Daily page every day. Use it when it helps, skip it when Weekly is enough, and continue from the next useful page.
Tutorial Page 8/10 - Yearly Page
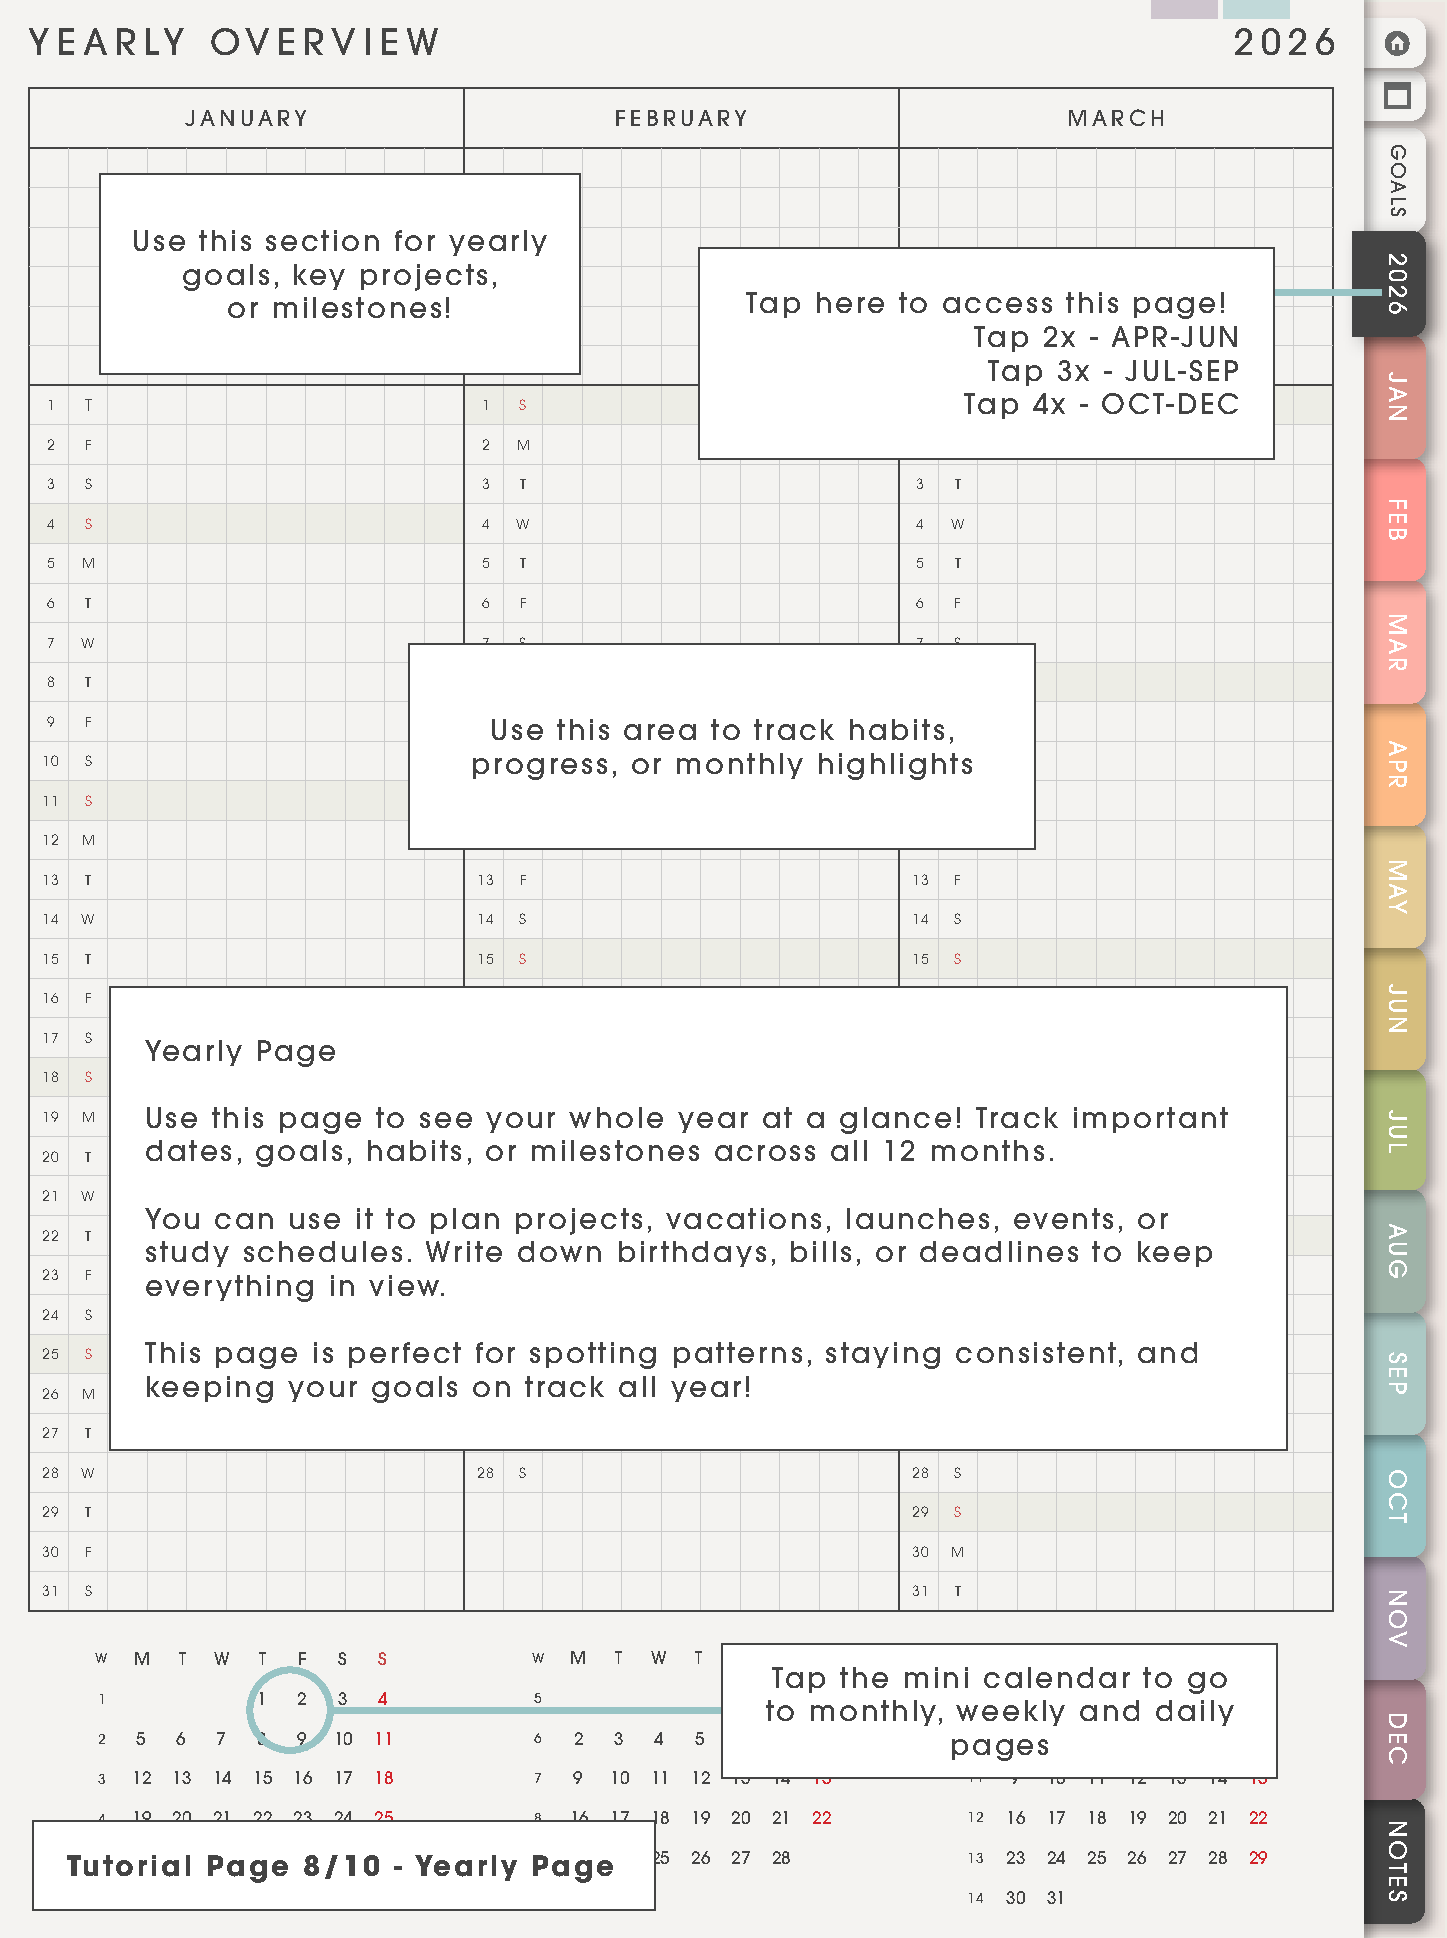
Use Yearly for patterns across the full year: school terms, exam seasons, trips, yearly goals, launches, holidays, renewals, habit patterns, and project timelines.
This page is useful when something is far away but still needs a path into the current month or week.
Tutorial Page 9/10 - Goals Page, Life Planner
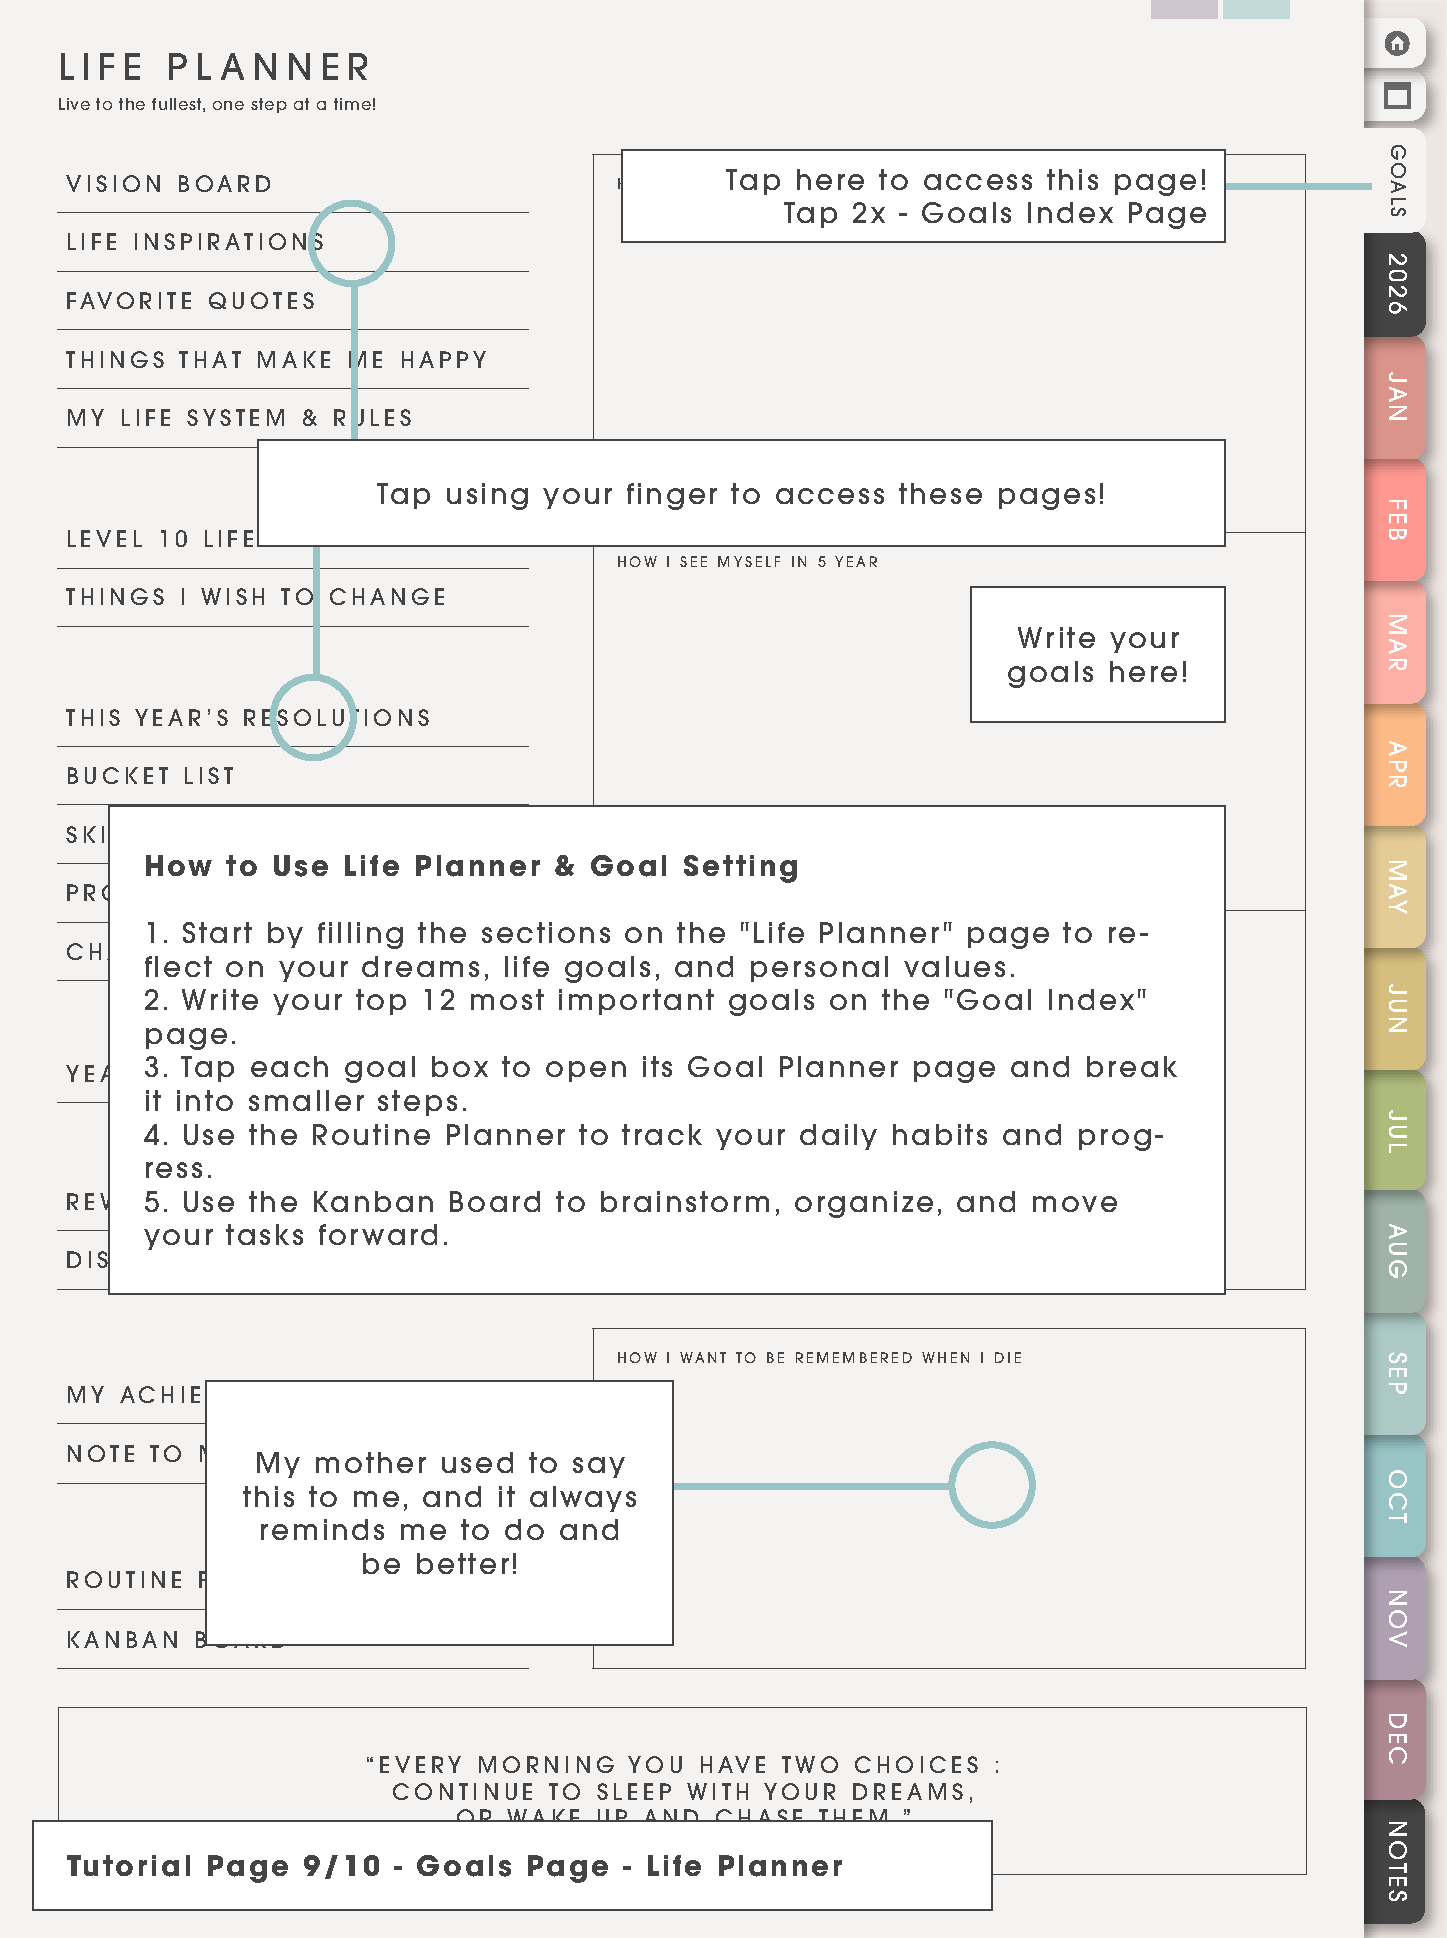
Use the Life Planner Goals Page when you want a bigger-picture reset. Choose direction first, then turn only one or two goals into real actions.
This page works best when it supports your week. If it starts feeling heavy, choose one goal, one next action, and move that action to Weekly or Daily.
Tutorial Page 9/10 - Goals Page, Goal Index
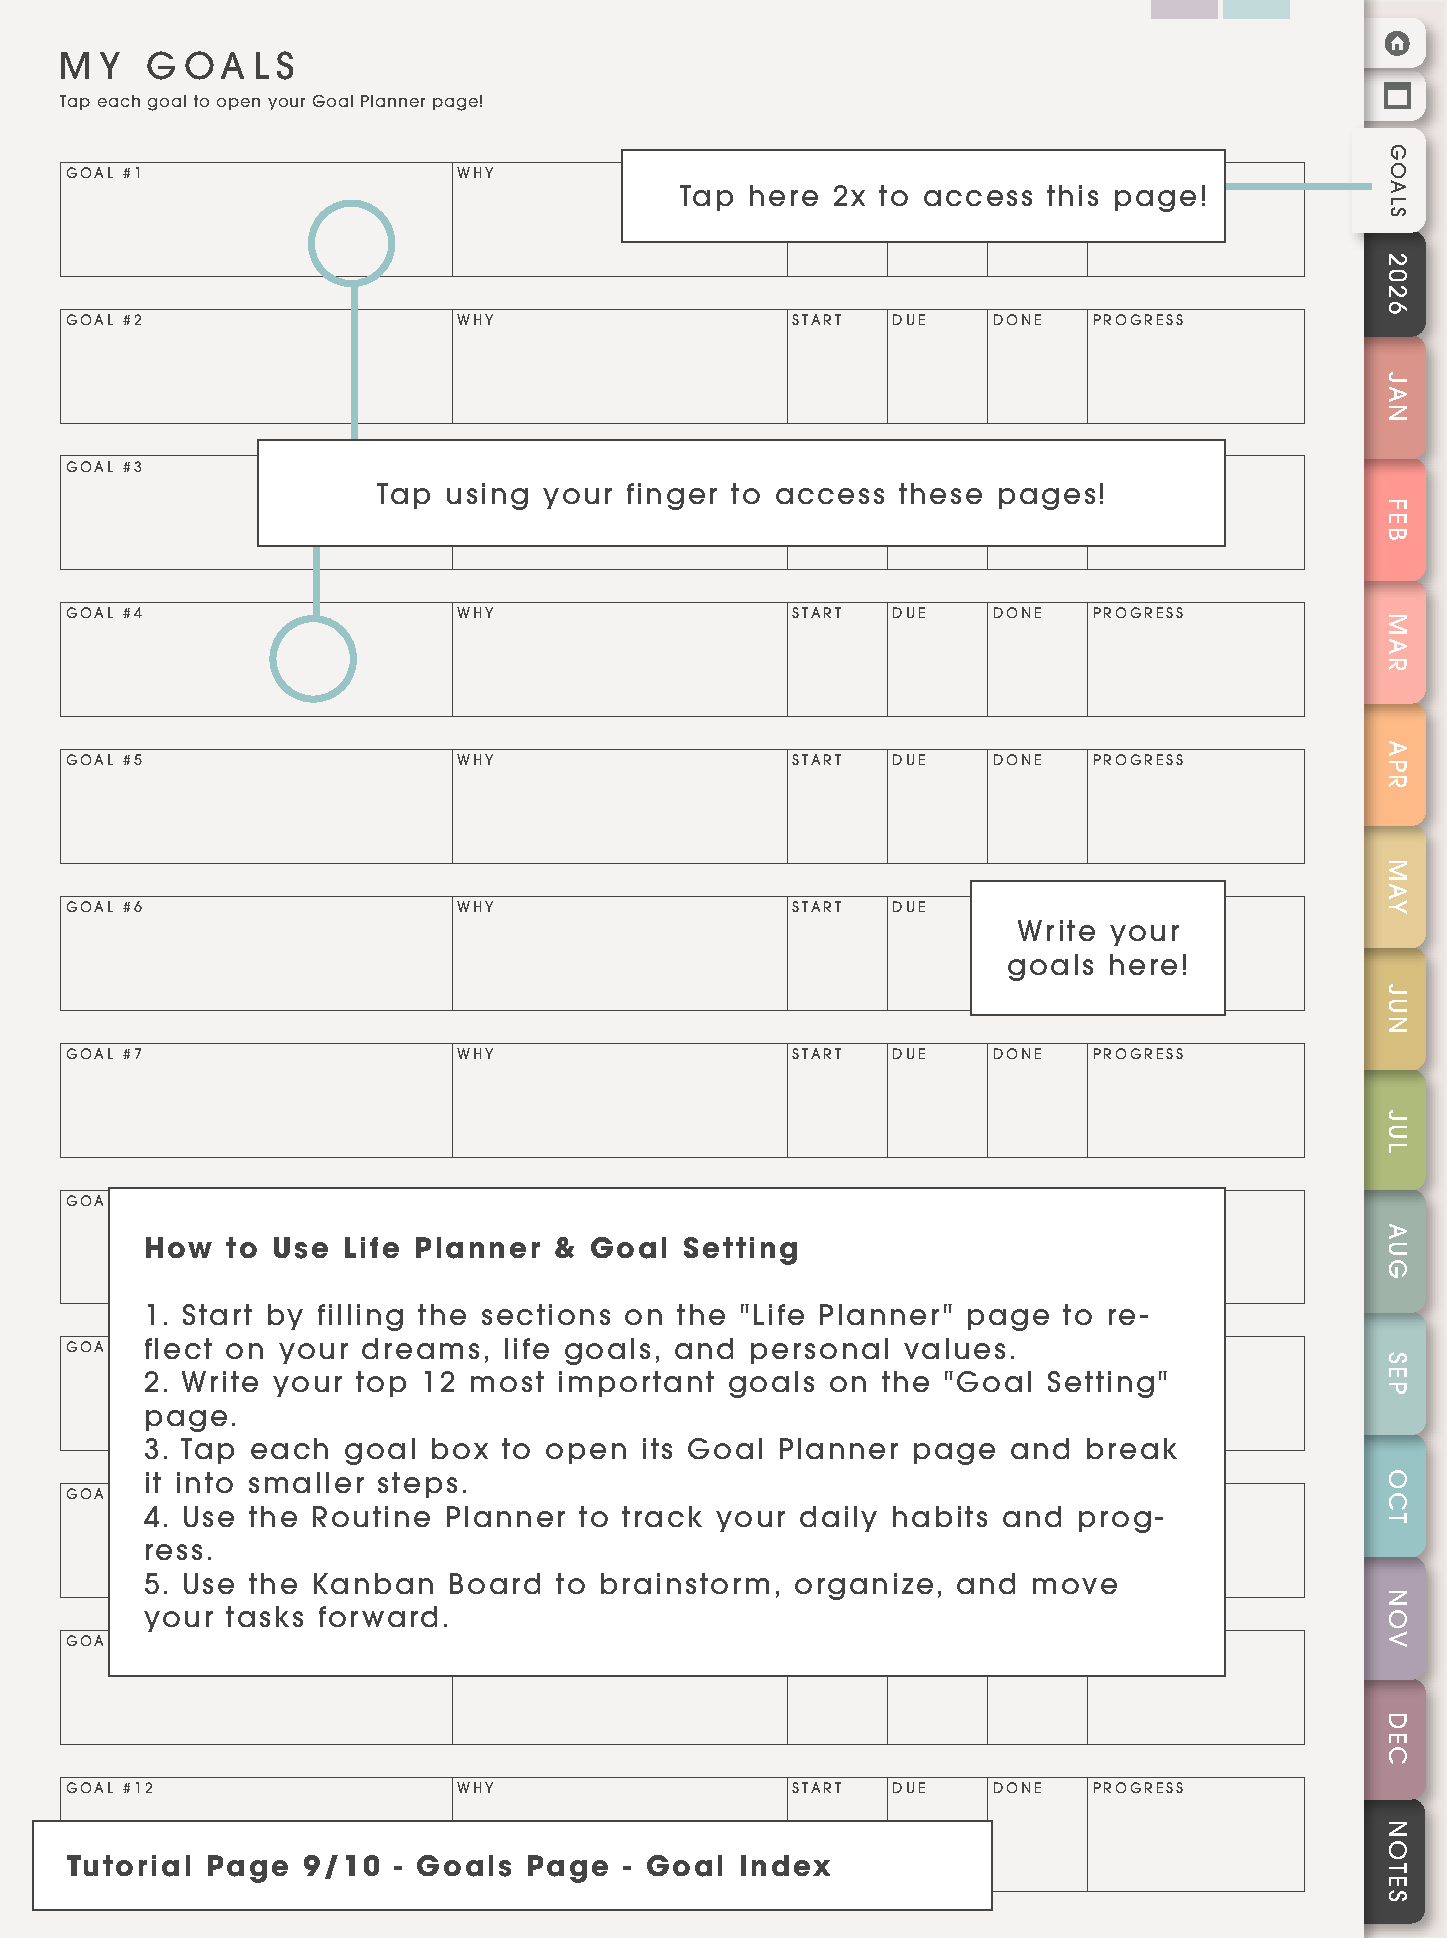
Use the Goal Index as the list of bigger goals. It is not a page to fill perfectly on the first day. Choose the goals that are actually active, then open the detailed Goal Planner page for the one that needs planning now.
Tutorial Page 9/10 - Goal Planner Page
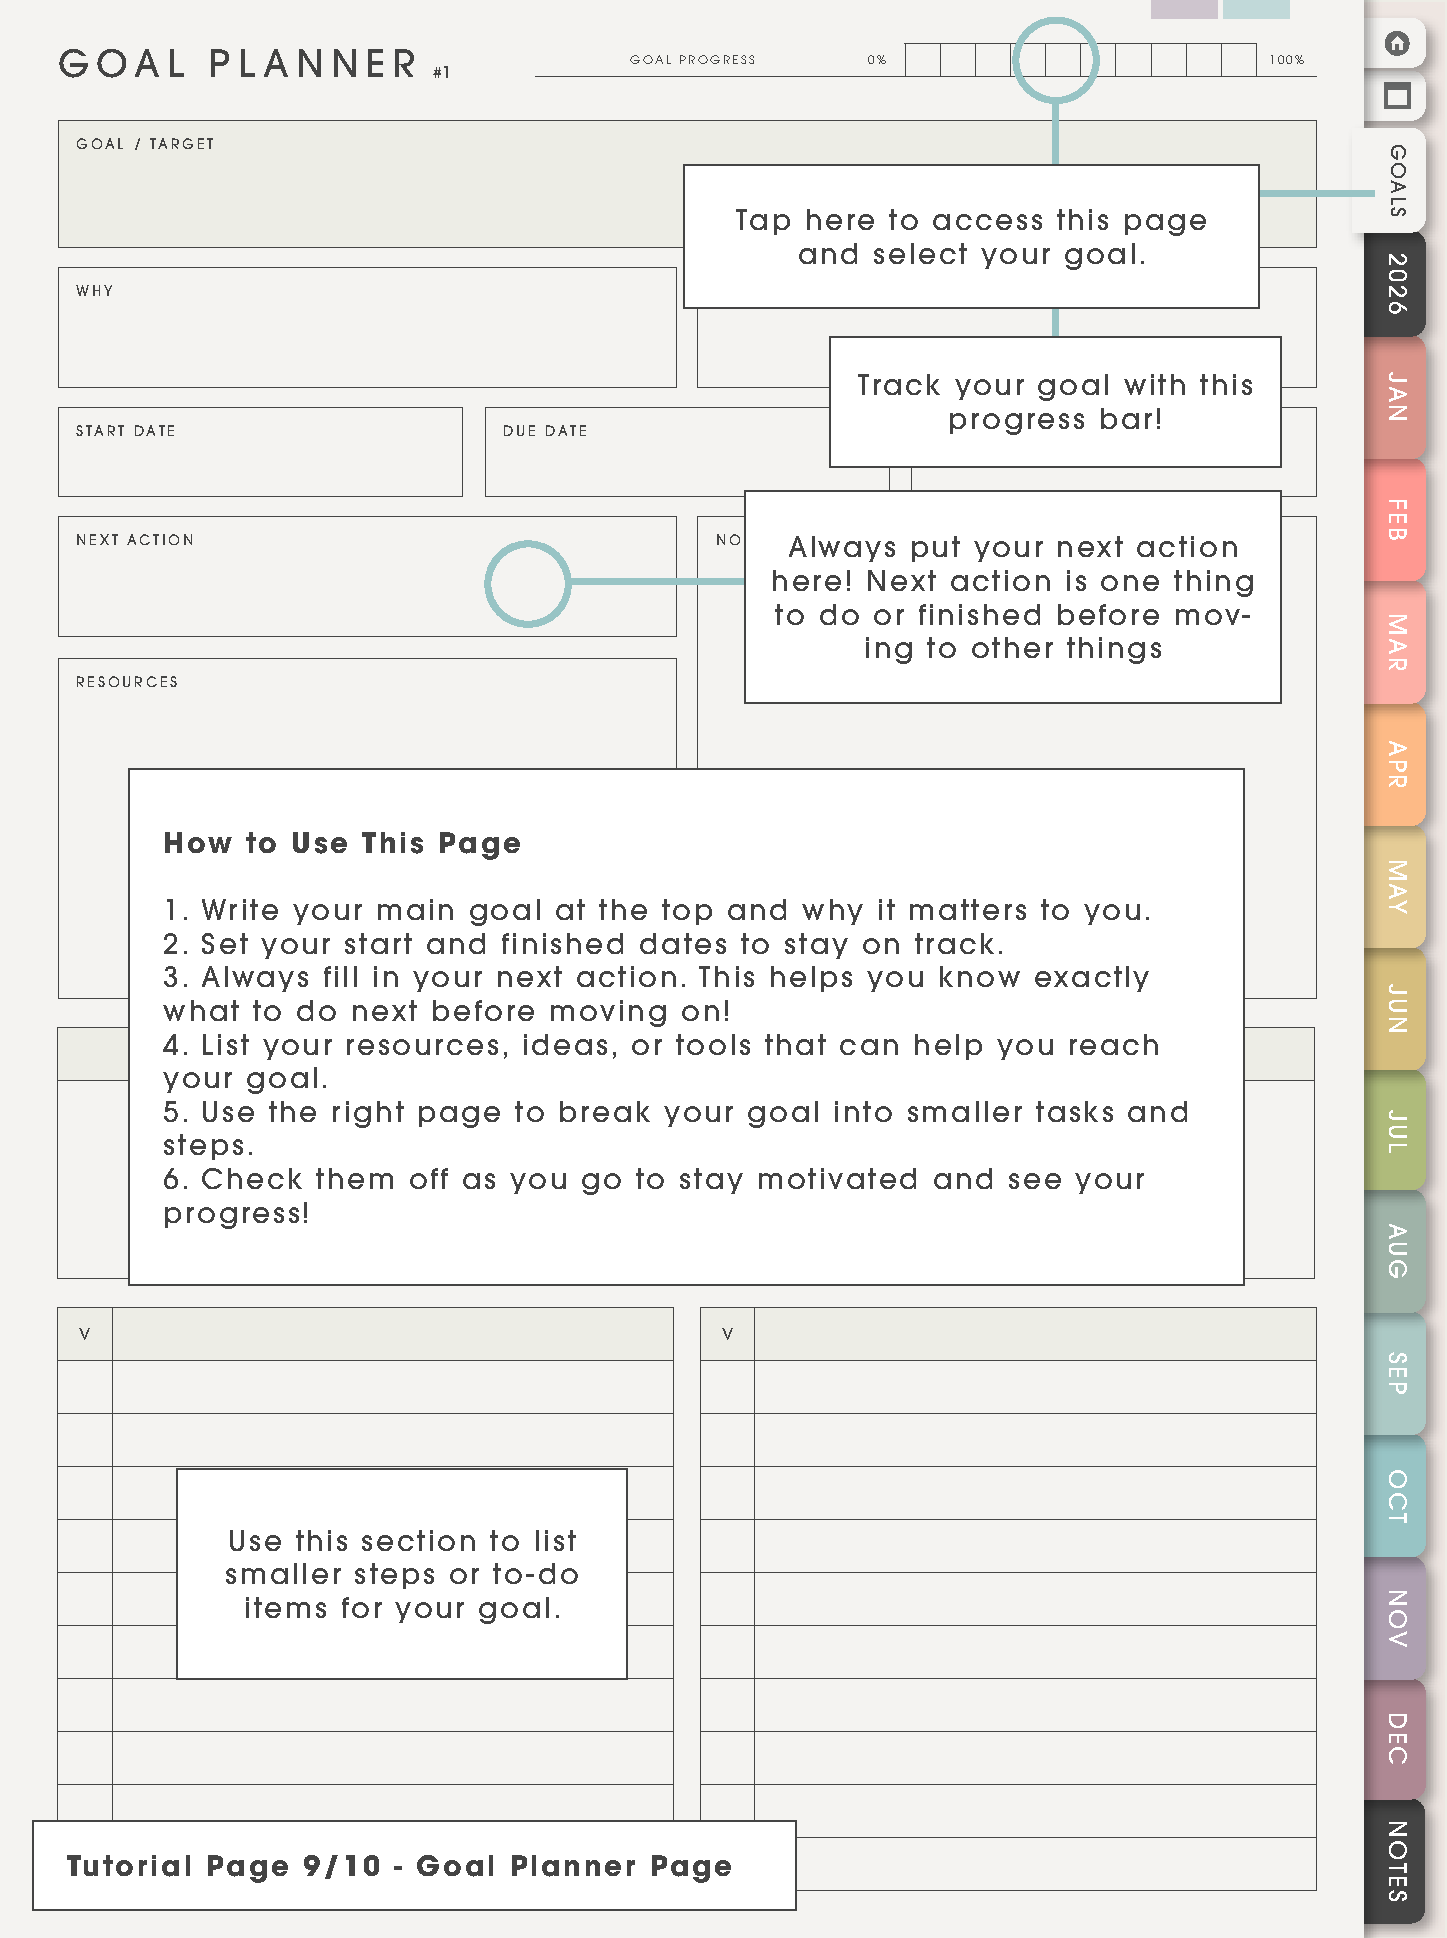
Use Goal Planner for one goal at a time. Write the goal, why it matters, start date, due date, resources, roadblocks, notes, and progress.
The next action box is the most important part. When a goal feels too big, choose the next visible action and put that action on Weekly or Daily.
Tutorial Page 10/10 - Notes Index

Use Notes Index for information you want to find again: study notes, meeting notes, recipes, reading notes, travel notes, project ideas, budget notes, journaling, or reference lists.
Write the note title on the index, then keep the actual note on the matching notes page. This keeps extra information from getting buried behind calendar pages.
What is different about Yume Techo Portrait
Yume Techo Portrait is helpful when you like a notebook feeling: one tall page, comfortable handwriting space, and a planner that feels easy to read on tablets and phones. Use the portrait layout when you want daily planning, journaling, study notes, lists, reflections, and Life Planner pages to feel closer to a paper notebook.
If you like seeing a lot of columns at once, Yume Techo Landscape may feel wider and more dashboard-like. If you like scrolling down one clean page and writing longer notes, Portrait is usually easier.
How to use this planner first
- Use Index as the home base. Open Index or Table of Contents first, then choose the section you need today.
- Put fixed dates on Monthly. Birthdays, bills, deadlines, school dates, appointments, launches, trips, and renewals belong here first.
- Use Weekly for the real working plan. Choose what matters this week: appointments, routines, class blocks, work blocks, errands, and the next few actions.
- Use Daily only when the day needs more room. Daily pages are helpful for busy days, messy days, study days, or days with many notes.
- Use Notes and Template Pages for overflow. Long lists, project details, trackers, references, and ideas do not need to crowd the calendar pages.
- Use Life Planner pages for direction. Vision, goals, routines, finance, health, study, work, travel, and reflection pages are for bigger-picture planning, not daily pressure.
What each main area is for
- Index and Table of Contents: the navigation map for the whole planner.
- Yearly pages: big dates, school terms, launches, trips, renewals, holidays, and events that affect more than one month.
- Monthly pages: birthdays, bills, appointments, deadlines, projects, reset days, and month themes.
- Weekly pages: the real working plan for classes, work shifts, meals, errands, study blocks, content plans, and family logistics.
- Daily pages: the short list of what actually happens today, especially when the week feels too big.
- Life Planner and Goal pages: direction, routines, health, money, study, work, travel, and long-term planning that needs more room than a calendar box.
- Template pages: reusable pages for lists, trackers, projects, notes, challenges, kanban boards, photos, and collections.
- Notes Index: the place to organize notes so they do not get lost behind calendar pages.
What to start with first
- Index: the page you return to when the planner feels too big.
- Current Monthly: the page for dates that already exist.
- Current Weekly: the page for what needs attention this week.
- One Daily page: optional, only when today needs more detail.
- One Notes page: the place for messy thoughts, project details, or lists you do not want to lose.
- One Template copy: choose only one reusable page to try first, such as a tracker, routine, kanban, study, finance, or project page.
A simple first-week setup
For the first week, use the planner like this: write fixed dates on Monthly, choose one weekly focus, add only the must-do tasks to Weekly, use Daily when the day needs more detail, and put overflow thoughts on one Notes page. At the end of the week, keep what worked and ignore pages that did not help yet.
Read deeper page ideas
This Product Tutorial is the map. The detailed examples live in Tips & Ideas so each topic can be complete without making this article too crowded.
- How to start Yume Techo without getting overwhelmed
- Index page ideas
- Yearly overview ideas
- Monthly page ideas
- Weekly page ideas
- Daily page ideas
- Life Planner ideas
- Goal Planner ideas
- Template Pages ideas
When the Yume Techo Portrait setup gets tricky
1. The page feels long
What happens: Portrait pages can feel like a lot to scroll through, especially when you are looking for one small section.
What to do: use Index and Table of Contents first. Choose the section from the map, then use bookmarks or favorites for the few pages you open every day.
2. Monthly boxes feel small
What happens: long tasks, appointment details, or project notes can make the monthly page crowded.
What to do: keep Monthly for dates and short labels. Put the details on Weekly, Daily, Notes, or copied Template Pages.
3. Life Planner pages become too much
What happens: vision, goals, routines, finance, health, study, work, travel, and reflection pages can make the planner feel like homework.
What to do: choose one Life Planner page only when it solves a real problem. For example, use Routine Planner when mornings are messy, Goal Planner when one project needs a plan, or Finance when money dates need a home.
4. A copied template page disappears into the planner
What happens: the clean template is copied, but it is hard to return to the filled version later.
What to do: bookmark the copied page, rename it if your app allows page labels, or write the copied-page topic on a personal index page.
Where to go next
Yume Techo Portrait explains the product pages. For page ideas, use Tips & Ideas. For app buttons, imports, page copying, bookmarks, covers, stickers, or device problems, use the Help Center guide for your app.
Still need help?
Send your order number, product name, device, app, and a screenshot or short screen recording if the issue is visual.